Home Brewing Equipment Cleaning and Sterilization

Cleaning and sanitizing home brewing equipment is the most important and often most neglected step in the brewing process. If the brewing equipment is not cleaned and sanitized properly it can ruin the batch. You put hours of work into your beer, so why take a risk? Cleaning and sanitizing is easy and quick, and I’m going to cover the basics for you in this post.

Everything that comes in contact with your wort needs to be cleaned and sanitized. Your brew pot doesn’t actually need to be sterilized, because the heat from the boil will keep the pot sterile. You still should check and make sure that their is no visible debris before starting though. Cleaning is the process of removing any debris you can see, but cleaning wont take care of the germs you can see. Sanitizing your equipment actually kills the bacteria you cant see.


Cleaning the Equipment:

It is best to use bleach or OxiClean to clean your equipment, but it is ok to clean your equipment with a household detergent (like dish soap). If you must use a detergent, dont use anything scented and make sure you carefully rinse after cleaning. Rinsing is really important during this step, because any of these chemicals can ruin your beer if they make it past this step. Also it is important to never use anything abrasive when cleaning as it could scratch your equipment (making it much harder to properly sanitize).

Do: Rinse thoroughly            Don’t: Use a scented detergent or abrasive cleaning tools


Sanitizing the Equipment:

There are lots of products out their made specifically for sanitizing home brewing equipment.  Bleach and Iodophors would be the most common, however there is Potassium Metabisulfite, Sodium Metabisulfite, Napisan… and the list goes on!

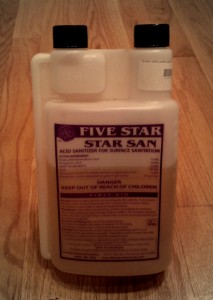
I highly recomend Star-San, which is a iodophor. The main ingredient is phosphoric acid, and it is no rinse (which makes it really simple). This is probably the most popular and widely available sanitizing agent for home brewers.

star san sanitizer

Star San Sanitizer

What equipment to sanitize:

  • Carboys / Fermenters
  • Bottling Bucket
  • Stiring Spoon
  • Tubing
  • Bottles or Keg
  • Chillers
  • Airlocks, Plugs, Lids

The process of cleaning and sterilizing your equipment may not be as fun as brewing, but it is just as important! This method can be used with any of the home brewing kits and equipment on this blog, so don’t risk it. Some equipment has advantages / disadvantages when sterilizing, so make sure you check out some of the equipment variations.

Cheers!

Categories: Beer 101, How to Brew Beer | Tags: , , , | Leave a comment

Home Brewing Kit Glass Carboy Advantages

My last post discussed plastic primary fermenter options and their advantages and disadvantages. Plastic Ale Pails are cheap, easy to carry (handle), and they do a good job of shielding your brew from the sun. The next step up from a plastic Ale Pail would be a Glass Carboy.

Glass Garboy Advantages: 

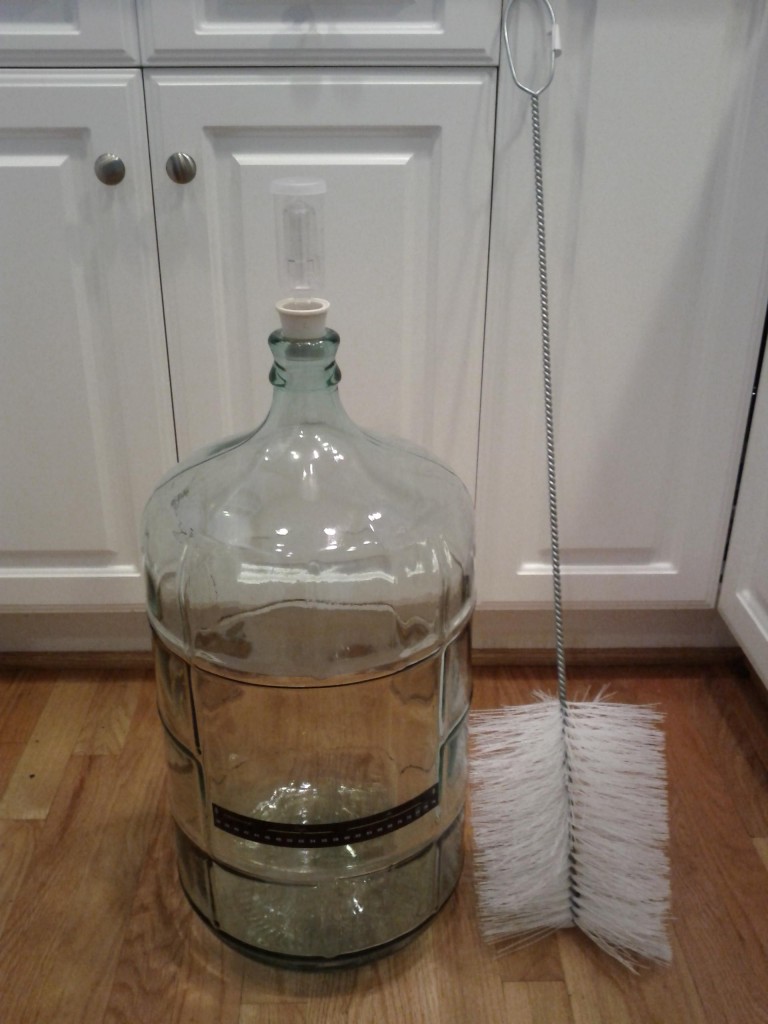
glass carboy with rubber stopper airlock and brush

Glass Carboy with Rubber Plug, Airlock, and Brush

  • Visibility (watch the fermentation process and know when it is complete)
  •  Smaller Diameter Opening (Easier to get a tight seal)
  • Easy to sanitize (reduced risk of scratching).
  • No leaching

You can use a glass carboy as your primary fermenter and/or your secondary fermenter as well. A really common set-up for a good home brewing kit would have a plastic ale pail as the primary and a glass carboy as the secondary fermenter. One of the drawbacks that I mentioned with plastic is that it can scratch, which could make sanitation more difficult and ultimately contaminate your brew. Glass wont scratch with any normal cleaning brush (they make special carboy brushes, and sanitation is much easier / effective.

Another problem that plastic fermenters have is the diameter of the opening at the top. This is great for access and cleaning, however it makes it difficult to seal for storage. If the rubber seal on the inside of the lid doesn’t contact the pail around its circumference at any certain point it will cause oxygen to seep in. This will cause your beer to oxidize and could potentially contaminate your beer as the environment is no longer sterile. Glass Carboys have a small aperture (about 2″ diameter) which makes it extremely easy to seal with a rubber stopper.

Glass Carboy Disadvantages (and Solutions)

There are a couple disadvantages to Glass Carboys that you need to be careful of (don’t worry I’ve got solutions!). The glass carboy is considerably heavier than it’s plastic equivalent on its own, and when you add in you brew it can get really tough to maneuver. Worst case scenario would be that the glass carboy gets dropped and you loose all your hard work when it breaks (not fun).  Carboy straps add handles – much easier to carry – a really cheap/worthwhile investment. Finally when you store your brew in a glass carboy, make sure to keep it out of direct sunlight. Put it in the closet, cover it in blankets – anything to keep the sunlight from reaching your beer.

When buying a glass carboy I would recommend getting one that holds 5 gallons or more. The majority of extract recipes out there are for 5 gallon batches. You do have the option of doing smaller batches with the larger fermenters without any problems if you happen to come across a 3 gallon recipe you want to try.  Here is a home brewing kit that comes with a glass carboy if your new to brewing, or you can check out these other home brewing kits for beginners. 


Categories: Home Brewing Equipment | Tags: , , , , | 1 Comment

Plastic Primary Fermenter Options for Home Brewing

Fermentation takes around two weeks to complete, and could take significantly longer depending on what style of beer you are making. The wort (unfinished beer) stays in the primary fermenter or carboy for this amount of time. It’s important that you choose the right primary fermenter or carboy, as your wort will be stored there for almost the entire process.

I received a comment this morning on the “Beginners Home Brewing Kit” article that was posted on September 20th. It brought up some important questions about Primary Fermenters and Carboy options for home brewing that I want to share. Here is the comment:

comment home brewing kit primary fermenter carboy

Primary Fermenter / Carboy Comment

My original post was about a beginners home brewing kit that came with an “Ale Pail” as the primary fermenter. Although it looks like a large paint bucket that you may get at a home improvement store, the plastic it is made from is completely different. Ale pails are made with food grade plastic, otherwise known as PET (Polyethylene Terephthalate). PET wont leach into your beer over the two weeks it’s stored there, and you could have this problem with a basic paint bucket. They’re not expensive, so they’re definitely a worthwhile investment. There are also plastic carboys that are clear that do a pretty good job. The advantages of a clear plastic carboy is that you can see whats going on at all times, just make sure to not expose your wort to direct sunlight. I’ll be doing an article on glass carboys in the future also. Here are some of the plastic options out there:

primary fermenting bucket home brewing

Primary Fermenting Bucket

better bottle plastic carboy

Better Bottle Plastic Carboy

I’ve NEVER had an issue with mold, but that is probably unrelated to the type of plastic being used. Mold can be caused when the bucket isn’t 100% sanitized. Scratches and gouges can create creases that your sanitizer may not be able to penetrate. Fermenters are stored at room temperature and have a lot of trapped moisture, which makes it an environment conducive for mold if not sanitized properly.

If you are using any kind of plastic fermenter in your home brewing kit, thoroughly inspect your pail before transferring your wort. I look for any scratches or gouges thicker than my fingernail. A common mistake is using an abrasive pad or abrasive brush when cleaning the bucket. The plastic itself is not very rigid, and anything abrasive can end up scratching the surface making it more susceptible to contamination. It’s also not a good idea to store anything in the buckets between batches (especially nothing metal like stirring spoons or cans of Liquid Malt Extract).

As long as your ale pail is sanitized and sealed shut, there is no possibility for mold. I’m going to do some follow-up posts on proper sanitizing procedures as this is often neglected step that can lead to some frustration. Feel free to check out some of the beginner home brewing kits if you’re new to home brewing and you’re looking for a good place to start.

Have fun choosing your next primary fermenter – Cheers!

Categories: Home Brewing Equipment | Tags: , , , | 1 Comment

Craft Beer Club

Nothing beats beer that your brew yourself, but craft beer comes pretty darn close. Craft beer is traditionally brewed beer made by a small independent brewer. They use the same process as you would at home, which results in high quality unique beer. Most local stores wont carry a good selection of craft beers, and beer made by the smaller brewers can be extremely hard to find – you certainly can’t find them at most liquor stores.

One good way to try new craft beers is joining a craft beer club. They select unique craft beer from the best brewers in the country and send them to you directly. Craft Beer Club offers the best value and selection; they also offer free shipping which saves time and money.

Craft Beer Club Craft Beer

Craft Beer

Of course brewing your own beer is ideal, but if you don’t have the time – this is the next best thing. Craft beer always provides me with inspiration for my next brew, and I’ve gotten some great ideas from them. Craft Beer Club is a great gift idea for friends and relatives (it sure beats the heck out of fruit of the month!). I thought it would be a good time to mention Craft Beer Club because they are giving away Beer Tasting Glasses and Bottle Openers with the first shipment.

Take a look at my posts on types of beer and basic beer ingredients if you need more information on how craft beer is made.

Cheers, and have fun tasting new craft beers!

Categories: Great Beer | Tags: , , | Leave a comment

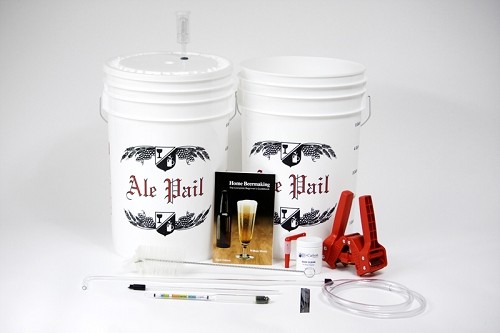
Beginners Home Brewing Kit

I found a new Home Brewing Kit for beginners that has a higher capacity than some of the compact starter kits mentioned in previous posts. The Beginners Home Brewing Kit contains all the basic equipment that you need to start brewing, but it does not contain the ingredients. I started out on a similar system, and if you like to experiment with your own ingredients, this kit might be for you. Here is what comes with the kit:

Beginner Home Brewing Kit

Beginner Home Brewing Kit

  • 6.5 Gallon “Ale Pail” Primary Fermenter with Drilled & Grommeted Lid
  • 6.5 Gallon “Ale Pail” Bottling Bucket with Bottling Spigot
  • Easy Clean No-Rinse Cleanser
  • Airlock
  • Siphon & Bottling Set-up
  • Home Beermaking Text
  • Hydrometer
  • Bottle Brush
  • Twin Lever Capper
  • Liquid Crystal Thermometer
  • Bucket Clip
What you’ll still need to get:
  • Ingredients for your beer
  • Bottles and Caps (The Capper does come with the kit) or Keg for your finished beer.

The best part about this kit is that the large capacity “Ale Pails” allow you to experiment with different beer recipes. Typical home brew recipes make about 5 Gallons of beer, so this is perfect for the home brew recipes you find online and in most home brewing books.

Have fun experimenting –

Cheers!

Categories: Home Brewing Kits | Tags: , , , , , | 4 Comments

Bottling Home Brewed Beer

There are two options for storing and carbonating your beer. This first option is bottling your beer, and the second option is kegging your beer. Most home brewing kits use plastic or glass bottles to naturally carbonate your beer, and I will be explaining that process in this article. If you keg your beer you would be force carbonating your brew using a CO2 Canister. I will be discussing bottling and natural carbonation in this article and kegging in a later article.

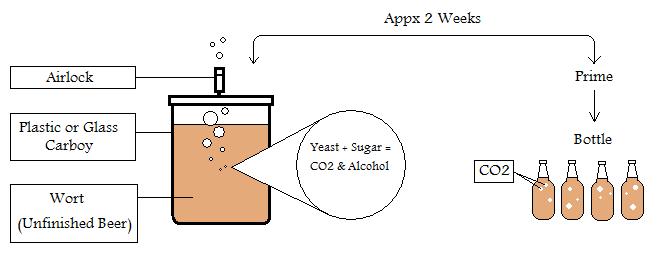
Here is a basic diagram of the bottling process in most Home Brewing Kits:

Fermentation and Bottling with Home Brewing Kits

Bottling Your Home Brewed Beer


You will know when fermentation is complete when your stop seeing bubbles/activity in your airlock. This can be anywhere from 1 week to 3 weeks, because it depends heavily on the ingredients/recipe that you’re using for your beer.

At this point your wort has no carbonation, and if you were to bottle your wort without priming you would end up with flat beer. Priming is the process of adding a small amount of sugar (or dry malt extract) to the wort before sealing the wort in the bottles. There is just enough yeast left at this point to eat some of the sugar from priming and produce CO2 as a bi-product. Since the bottle is sealed, the CO2 is trapped in the bottle and gets absorbed into the beer.  I like to use a small amount of dry malt extract to prime, because I find it gives the beer a nice thick head.

Your recipe or Home Brewing Kit should have instructions on what to prime with and how much to prime with. You want to follow these instructions carefully. Too much sugar could cause the bottle caps to pop off (too much pressure), and not enough could prevent your beer from carbonating at all.

Tips for bottling your beer:

  1. Make sure you sanitize all the equipment that comes in contact with the beer. Sanitize the bottling bucket, lines, bottles, and even the caps.
  2. If you’re using a bottling bucket, try to minimize the amount of oxygen you expose the wort to when transferring. The best way to do this is to use an auto siphon in your carboy and run the line to your bottling bucket.
  3. If priming with DME or sugar, you usually boil it first and then add it to your wort. I find that adding it to the bottom you your bottling bucket and then placing the line from your carboy in the bottling bucket at an angle gives me the best results. When you transfer the wort through your line it will “swirl” with the sugar / DME and make sure it mixes properly while exposing the wort to a minimum amount of oxygen.
  4. Don’t put the bottles in the fridge until it’s done carbonating. The fridge will prevent your beer from carbonating properly.

After you have your beer into the bottle, you need to wait for it to carbonate. My beer usually takes about 3 weeks to carbonate. Again, however, the amount of time to properly carbonate varies on the ingredients / recipe that you are using. It’s good to have a couple of “test” bottles. Try a test bottle every week until the beer is carbonated to your preference.

Good Luck Carbonating your beer –

Cheers!

Categories: Beer 101, Home Brewing Kits | Tags: , , , , , , , , , , , | Leave a comment